Category: Computers

Foxit PDF Reader on Linux with Wine

I don’t very much like Evince or other FOSS PDF readers on Linux. I do however like using Foxit on windows. They do actually provide packages for Linux packages but there is a long standing rendering bug where everything is super stretched out vertically. There does not seem to be an solution to the bug in sight. However, while perusing the support forums someone mentioned they had good success using the Windows version in Wine. Ok! Fine.

I want this to be separate from the Wine root in my home directory so it is self contained and can be copied from one machine to another. I’m lazy.

mkdir -p /opt/foxitwine/wineroot
cd /opt/foxitwine/
<wget your foxit installer .exe in here>
WINEPREFIX=/opt/foxitwine/wineroot wine FoxitReader97_Setup_Prom_IS.exe

Now install Foxit Reader, I put it in c:\FoxitReader for brevity.

Thing is, you want this to integrate nicely with your Linux desktop, so, here’s a FoxitReaderWine.desktop file:

[Desktop Entry]
Name=Foxit Reader Wine
Comment=View pdf documents
Keywords=pdf;ppdf;
StartupNotify=true
Terminal=false
Type=Application
Categories=Application;Office;Viewer;X-Red-Hat-Base;
MimeType=application/pdf;application/ppdf;
Icon=FoxitReader
Exec=/usr/bin/env bash -c "printf 'z:%%q\\n' %F | WINEPREFIX='/opt/foxitwine/wineroot' xargs wine 'C:\\FoxitReader\\FoxitReader.exe'"

I was having an issue with getting the file argument successfully passed to wine so I mined this discussion for a handy solution.

mv FoxitReaderWine.desktop /usr/share/applications/

All done.

Firewall script without service

Sometimes on Linux systems for one reason or another it is not practical to use the built-in iptables-services or iptables-persistent to handle your firewall rules. For example, cPanel/WHM manages its own firewall rule set and does not care what is in the normal iptables rules file.

A very straight forward solution to this is run a script in cron to check if your rules exist presently and if not, add them.

#!/bin/bash
# firewall.sh
# This script is run with cron to make sure iptables rules to block Portmap are present

function addrules {
  iptables -I INPUT -m tcp -p tcp --dport 111 -j DROP -m comment --comment "Portmapper Vulnerability"
  iptables -I INPUT -m udp -p udp --dport 111 -j DROP -m comment --comment "Portmapper Vulnerability"
}

numrulesfound=$(iptables -nL |grep -c "Portmapper Vulnerability")

if [ $numrulesfound -eq 0 ]; then
  echo "Portmapper iptables rules NOT found, adding"
  addrules
elif [ $numrulesfound -gt 0 ]; then
  echo "$numrulesfound Portmapper iptables rules found, exiting"
fi

And some kind of cron to run it periodically:

0 * * * * /root/firewall.sh > /dev/null 2>&1
, , , ,
[Top]

Disable password in Windows 10

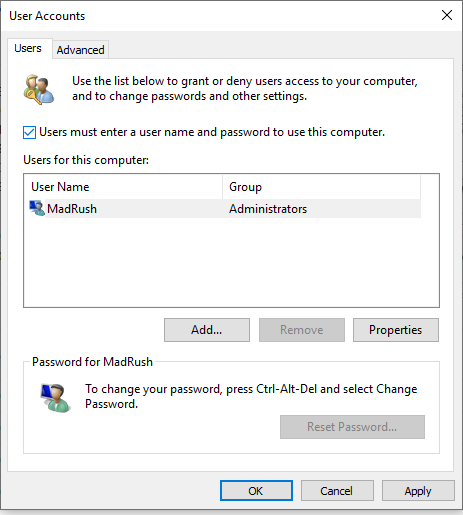
Run netplwiz and uncheck “Users must enter a user name and password to use this computer”

netplwiz
netplwiz

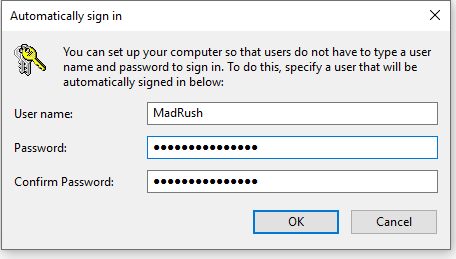
It will ask you for your current password, then you are done.

Automatically sign in

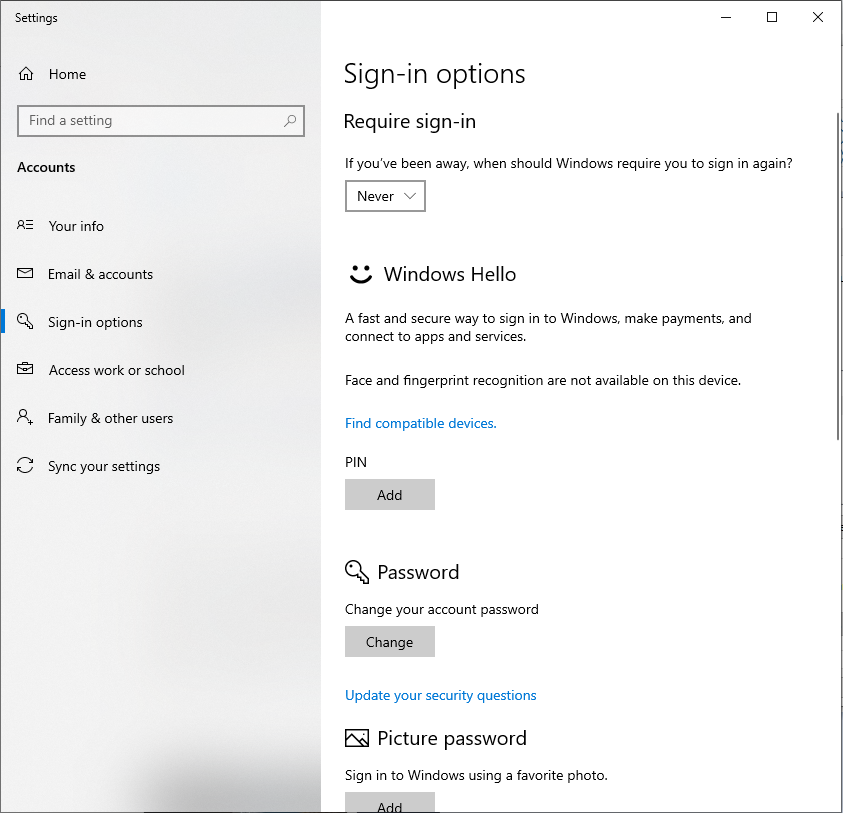
Now to prevent Windows from asking for a password when you come back from suspend, search for ‘sign-in’ > set “If you’ve been away, when should Windows require you to sign in again?” to ‘Never’

, ,
[Top]

Moving MariaDB Data Drama

For those of you who work with MySQL on CentOS or RedHat servers on a regular basis, running out of room for large MySQL databases on the root partition is pretty common.  The default options in the OS installer suggest a 30GB root partition which has probably been the default value for at least ten years.  Normally, this is easy to remedy. However, I was trying this on a server with MariaDB …

Trying this both via editing my.cnf and by simply a symlink produces failure:

Sep 14 16:49:06 id27131.1wpo.com mysqld[22796]: 2017-09-14 16:49:06 140313610287360 [Note] /usr/sbin/mysqld (mysqld 10.1.26-MariaDB) starting as process 22796 …
Sep 14 16:49:06 id27131.1wpo.com mysqld[22796]: 2017-09-14 16:49:06 140313610287360 [Warning] Can’t create test file /var/lib/mysql/id27131.lower-test64 ID=15680 PROTO=UDP SPT=53 DPT=60246 LEN=192 UID=25 GID=25

Looks like it may be due to a bug with mariadb!

A tutorial on DO says you need to specify the socket for the MySQL client.. i didnt even try that as mysqld fails to start!
Seems like this would have to be done by changing  the variable basedir not datadir, I have yet to try that.

[Top]

Ergodox Scavenge Build

I bought my first ErgoDox from a coworker. Bringing a keyboard back and forth to work is a pain in the ass, so I built another one.

I used to have what I am pretty sure was a Chicony 5581.

Chicony 5581 Keyboard

Chicony 5581 Keyboard

For whatever reason some years back, during the height of my take-shit-apart-without-a-concrete-goal-in-mind phase, I lost the top half of the case, some components of the track ball, and some keycaps. Well, turns out this sucker used Cherry MX Blue switches. They feel quite a bit different from the low mile switches in my aluminum-acrylic-sandwich bodied ErgoDox I use at work. I’m not sure if the MX blues from ’88 are equivalent to modern days ones. Anyway I figured I would put those to use eventually.

Naked Chicony Keyboard

Naked Chicony Keyboard

Chicony Controller

Chicony Controller

Chicony Close Up

Chicony Close Up

Chicony Printed Circuit Board Back

Chicony Printed Circuit Board Back

Chicony Printed Circuit Board Back Detail

Chicony Printed Circuit Board Back Detail

Weller Soldering Iron

Weller Soldering Iron

There have been several ways to order ErgoDox keyboards either completely assembled or as a kit.  Currently you can get an assembled ErgoDox from ergodox-ez.com but starting at $270 its awfully expensive. Well, I have these key switches just waiting for a purpose, and key switches make up a large amount of the price of any mechanical keyboard.  Also, I already had a set of keycaps which aren’t included in kits anyway, so, instead of a kit I went ahead and ordered a pair of PCBs from mechanicalkeyboards.com, a teensy from PJRC and other miscellaneous bits from DigiKey.

It took a while and more than a little elbow grease to harvest the switches.  If you have not done something like this it involves jamming a screw driver under the switch while alternating between which leads you hit with a soldering iron.  The trusty ol’ Weller I inherited from my dad’s days of television repair got the job done, love that thing.

ErgoDox Printed Circuit Board

ErgoDox Printed Circuit Board

While the keycaps from the Chicony are doubleshot, they do not suit the ErgoDox well as they are sculpted, not flat DSA, which does not facilitate customizing your layout.  I did end up using a different set of non-DSA keycaps for the alpha which looked better matched with blank DSA caps I had for the modifier keys.


ErgoDox Teensy Controller

ErgoDox Teensy Controller

ErgoDox 3D Printed Assembly in Progress 1

ErgoDox 3D Printed Assembly in Progress 1

ErgoDox 3D Printed Assembly in Progress Close Up

ErgoDox 3D Printed Assembly in Progress Close Up

ErgoDox 3D Printed Assembled 2

ErgoDox 3D Printed Assembled 2

ErgoDox 3D Printed Assembled 4

ErgoDox 3D Printed Assembled 4

ErgoDox 3D Printed Assembled 3

ErgoDox 3D Printed Assembled 3

[Top]

Less Syntax Highlighting on Ubuntu 16.04 and Debian 8

Looking at shell scripts or just about anything without highlighting is painful. I use less a lot to page through long stuff, so why not have some color?

sudo apt install source-highlight

then add the following to your .bashrc:

export LESSOPEN="| /usr/share/source-highlight/src-hilite-lesspipe.sh %s"
export LESS=" -R "

This is modified from a script on GitHub. That script is specific to CentOS

[Top]

Pick from different Java Versions when launching JNLP

Extenuating circumstances require me to run more than one version of Java JRE for work. Instead of using packages from the distro, I got the .tar.gz’s right from Oracle. I had to manually add the plugin to Firefox. Then, I extracted both JRE into /opt/java, added /opt/java to my path and made symlinks:


carl@carlworkstation:/opt/java$ ls -l
total 8
lrwxrwxrwx 1 carl carl 20 Jul 1 15:01 java -> jre1.7.0_80/bin/java
lrwxrwxrwx 1 carl carl 20 Jul 7 16:05 java7-java -> jre1.7.0_80/bin/java
lrwxrwxrwx 1 carl carl 22 Jul 7 16:49 java7-javaws -> jre1.7.0_80/bin/javaws
lrwxrwxrwx 1 carl carl 20 Jul 19 14:52 java8-java -> jre1.8.0_92/bin/java
lrwxrwxrwx 1 carl carl 22 Jul 7 16:06 java8-javaws -> jre1.8.0_92/bin/javaws
drwxr-xr-x 6 carl carl 4096 Apr 10 2015 jre1.7.0_80
drwxr-xr-x 6 carl carl 4096 Apr 1 00:17 jre1.8.0_92

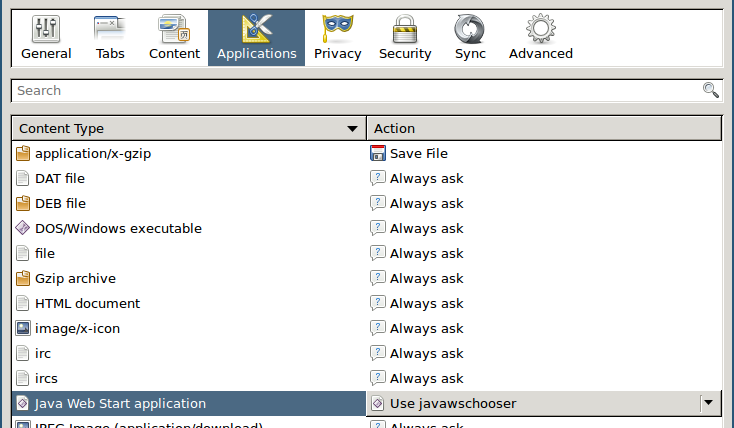
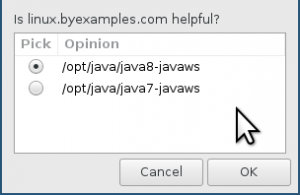
I wrote a little helper script which I use as the default application in Firefox for this, using zenity (actually I use Palemoon, but same difference).
firefox-java-web-start-application

#!/bin/bash
command=$(zenity --list --text "Is linux.byexamples.com helpful?" --radiolist \
--column "Pick" --column "Opinion" TRUE /opt/java/java8-javaws FALSE /opt/java/java7-javaws );
$command $1

Java Selector

Java Selector

[Top]

Password safe and GnuPG on Ubuntu 14.04

Once again here is how to verify and install Password safe. This is an update of an earlier post. Considering this software is guarding some of your most important secrets I see it worthwhile to verify the GnuPG signature. OS this time is Ubuntu 14.04 Trusty Tahr (Linux Mint 17.2 Rafaela).

Password safe

To verify the signature we need GnuPG.

  1. install gnupg

    $ sudo apt-get install gnupg

  2. import project administrator’s signing key (RSA)
    i. We’re going to import Rony Shapiro’s Password Safe Signing key. Go to https://pwsafe.org/contact.php click the link for “this public key”.
    ii. Save the page it gives you as pwsafe.key and strip out the HTML tags.
    iii. import the key

    $ gpg –import pwsafe.key
    gpg: key 5CCF8BB3: public key “Rony Shapiro (PasswordSafe Signing Key) <[email protected]>” imported
    gpg: Total number processed: 1
    gpg: imported: 1 (RSA: 1)
    gpg: no ultimately trusted keys found

    iiii. verify the key fingerprint against what is listed at the bottom of https://pwsafe.org/contact.php

    $ gpg –fingerprint
    /home/mrdesk/.gnupg/pubring.gpg
    ——————————-
    pub 2048R/5CCF8BB3 2011-02-10
    Key fingerprint = A703 C132 8EAB C7B2 0175 3BA3 9194 6451 5CCF 8BB3
    uid Rony Shapiro (PasswordSafe Signing Key) <[email protected]>
    sub 2048R/04B638E7 2011-02-10

  3. Download the package
    i. SourceForge (bleh) is the only place the .deb package is available. https://sourceforge.net/projects/passwordsafe/files/ Don’t be fooled, SourceForge lists 0.94BETA as the newest release, actually 0.97BETA is the newest as of the time of writing this article. In my case, passwordsafe-ubuntu-0.97BETA.amd64.deb. There are also .debs specific to debian, RPMs and source packages available.
    ii. Download the pakage signature. In my case, passwordsafe-ubuntu-0.97BETA.amd64.deb.sig
  4. Verify the Password Safe .deb package
    You need to have the .deb and the .sig file in the same directory.

    $ gpg –verify passwordsafe-ubuntu-0.97BETA.amd64.deb.sig gpg: Signature made Fri 09 Oct 2015 05:21:50 AM EDT using RSA key ID 5CCF8BB3
    gpg: Good signature from “Rony Shapiro (PasswordSafe Signing Key) <[email protected]>”
    gpg: WARNING: This key is not certified with a trusted signature!
    gpg: There is no indication that the signature belongs to the owner.
    Primary key fingerprint: A703 C132 8EAB C7B2 0175 3BA3 9194 6451 5CCF 8BB3

    Notice the fingerprint matches the one we verified earlier listed on http://pwsafe.org/contact.shtml — ok good!

  5. Go ahead and install

    $ sudo dpkg -i passwordsafe-ubuntu-0.97BETA.amd64.deb

  6. It will complain about dependencies for libwxgtk3.0-0, libxerces-c3.1, and libykpers-1-1. So, install your dependencies

    $ sudo apt-get -f install

Done! To verify your .deb has been installed:

$ dpkg –get-selections | grep passwordsafe
passwordsafe install

You can launch the password safe gui either by

$ pwsafe &

or by finding ‘Password Safe’ it in your launcher menu.

[Top]

Password Safe and GnuPG on Ubuntu 13.10

This was actually done on Linux Mint Petra but in this case its entirely Ubuntu compatible.  Yes, I know 13.10 is about to expire, don’t worry, I’ll fix this for 14.4 as soon as Linux Mint XFCE Qiana comes out and I put it on my desktop.

I am tired of resetting passwords, so the other day I set up Password Safe on my laptop.  It wasn’t hard but did take a little time so here is how to do it.  I took the extra few steps of verifying Password Safe’s signature because I take my passwords seriously.   As such, this guide steps through basics of GNU Privacy Guard (GnuPG).

Password safe

To verify the signature we need GnuPG.

  1. install gnupg

    $ sudo apt-get install gnupg

  2. import Rony Shapiro’s Password Safe Signing key (RSA)
    i. go to http://pwsafe.org/contact.shtml click the link for “this public key”.ii. Save the page it gives you as pwsafe.key and strip out the HTML tags.iii. import the key

    $ gpg –import pwsafe.key

  3. Verify the Password Safe .deb package

    $ gpg –verify passwordsafe-ubuntu-0.93BETA.amd64.deb.sig
    gpg: Signature made Fri 07 Feb 2014 01:07:50 PM EST using RSA key ID 5CCF8BB3
    gpg: Good signature from “Rony Shapiro (PasswordSafe Signing Key) <[email protected]>”
    gpg: WARNING: This key is not certified with a trusted signature!
    gpg: There is no indication that the signature belongs to the owner.
    Primary key fingerprint: A703 C132 8EAB C7B2 0175 3BA3 9194 6451 5CCF 8BB3

    Notice the fingerprint matches the one listed on http://pwsafe.org/contact.shtml — ok good!

  4. go ahead and install

    $ sudo dpkg -i passwordsafe-ubuntu-0.93BETA.amd64.deb

  5. it will complain about dependencies for libwxgtk2.8-0, libxerces-c3.1, and libykpers-1-1. So, install your dependencies

    $ sudo apt-get -f isntall

Done! To verify your .deb has been installed:

$ dpkg –get-selections | grep passwordsafe
passwordsafe install

You can launch the password safe gui either by

$ pwsafe &

or by finding ‘Password Safe’ it in your launcher menu.

, , , ,
[Top]

Virtualization issues with Old Hardware

Today I was working to create a Virtual Machine using Oracle VM VirtualBox so I could test a Windows 8.1 64 bit ISO. I have it installed on my Sony Vaio that is running an Intel Core 2 Duo T6600 Processor. Previously I had installed the 64 bit version of Windows 8.1 on this laptop so it does support a 64 bit operating system but I still could not create a 64 bit Virtual Machine. After some basic research on Google about the T6600 Processor and about Virtual Machines and how virtualization plays a role in them I found that this processor does not support virtualization and with out that support you can not create 64 bit Virtual Machines. Likewise if you are running Windows 8 you will not be able to enable Hyper-V (which comes installed with windows 8 and 8.1) because the processor lacks the support for virtualization.  Carl also had trouble with VMs on old hardware.

So that was Dan’s experience, I had problems too but I was trying something a little different.  I have an old AMD 64 3000+ based system on which I was hoping to set up a bare-metal hypervisor, mainly because I had never done so and thought it would be cool to learn for my own purposes and potentially beneficial for the new job I just started as a System Administrator.  Anyway, the hypervisors I am aware of are Microsoft’s Hyper-V (both as a role in Server and as a standalone), VMware’s vSphere, and the Linux based solutions KVM and Xen. My main issue was the ASRock 939Dual-SATA2 motherboard which uses a ULI chipset which in the Windows world only ever had drivers for XP and Vista.  Server 2012 wouldn’t even attempt to install, and after a few hours of monkeying around in the bios settings, actually flashing a new verison of the bios, I finally gave in and installed Server 2008 Core install.  Well it installed, but I had no networking! Presumably the ULI chipset having no drivers is probably why the onboard as well as PCI network cards are unrecognized by windows.   Confronted with a windows command shell and no networking and the grim prosepect of learning how to install Windows drivers at the command shell, I threw in the towel and moved on.  Next I tried vSphere … same thing! OK so why didn’t I try Linux from the get go? I don’t know.

XenServer LogoFinally I elected to get XenServer. Of course, again probably due to using archaic hardware, it would not install.  It did however get to the point where it was searching for installation media and could not find the local source, so it offered the option to install via FTP/HTTP/NFS. I elected to quickly set up a FTP server on my desktop and try it that way.  I did so on Ubuntu by installing vsftpd. All I needed to do was to modify a line in it’s config file /etc/vsftpd.conf :

# Let local users login
# If you connect from the internet with local users, you should enable TLS/SSL/FTPS
local_enable=YES

After which I was able to point my XenServer installer to where I extracted the XenServer ISO under my user’s home and give it my normal login credentials. Worked like a charm!  After which I just removed the FTP server.  Next time we’re going to actually set up some VMs in XenServer.

, , , , , ,
[Top]